
Last summer before we left Florida, I took delivery of supplies and instruction booklet from Sailrite.
I already had things like pins, fabric markers and paints, needles, hot knife, grommet installation tool and the sewing machine on hand. Here is a list of materials ordered for the flag project.
3 yards of Red
3 yards of Blue
3 yards of White
2 yards of Yellow
1 yard of Black
1 yard of Green
1 yard of Light Blue
1 yard of Red sticky backed Insignia Material
1 yard of White sticky backed Insignia Material
4 pks. of grommets
1 spool of white thread (and I already had some black on the boat to use)
25 ft. of white webbing
I also started out using basting tape but once I got going, I found it was more trouble than good.\
Hot knife blade for making grommet holes. You don't have to have this but it makes grommet installation so much easier.
 |
| Using the basting tape to hold the panels while I sewed... |
The Puerto Rican Courtesy Flag was the first sign of trouble... There was no mention in the instruction book that there are two different versions of the flag, and that both are in use. A chance comment I overheard clued me in. We made our flags using the darker blue triangle... but looking around, I noticed that some were using a lighter blue.
 |
 |
| Wonderful memories of that day back in the Bahamas with Sally! |
 |
| The instruction book has size appropriate patterns for the different stars for all of the flags! |
 |
| Dominican Republic sans emblem |
 |
| France |
Perhaps a more accomplished seamstress could just purchase the stuff and the instruction booklet and it would all be easy... But I am not that kind of seamstress...
To make it even more interesting... there are random small errors in the book and some of the flags have very little instruction at all so I really had to reason out some of the designs to avoid the seam ripper...
 |
| Adding the stars to Venezuela |

The mystery is that when I use the white thread, it sews along like a dream... but when I changed to black thread, which is slightly more heavy, it made loops on the top... Well, after sweating profusely and swearing like a sailor for about half a day, I finally got it adjusted and things went much more smoothly.
 |
| SVG and St. Lucia |
 |
| A FOUR FLAG DAY!!! |
 |
| Using the pattern to make the sunburst |
Flags with triangles that
had to be carefully fitted together were more of a challenge...
 |
| Antigua and Barbuda was one of the more difficult ones but it came out great... |
 |
| Beautifully done Netherlands Antilles NO LONGER USED!!! |
Some say that they are still flying this flag... Others say that it is proper to now fly the country flags of Sint Maarten and Curacao. In this discussion I found that the flag for Martinique is also flown in addition to the French flag... which is another thing altogether! For these I guess we will figure it out when we get there... as these patterns are not in the book!
 |
| She thinks she's helping... |
Luckily I learned my lesson (after finishing the flag for Netherlands Antilles) and consulted the internet to verify that the other flags are correct.
 |
| WRONG!!! |
 |
| Not helping... |
 |
| I used the internet for more detail on the emblem |
The book has patterns to be traced onto the white ensign material and then cut out and colored in.
The only one I made that was intricate was Dominica. I cut the red circle out from the red ensign material, then the small stars on the white and colored them green.

Then I traced out the parrots onto the white ensign material, two mirror images so that they face the hoist on each side... (another error in the book... it said they face the fly)
Note: The colors in the kit linked above don't include Brown so I bought this as well for the perch. I think the flag for Mexico also uses brown...
I found the pattern in the book to be a little too simplistic so I copied flags I found online for a little more detail but this is an optional step.
 |
| Painting the stars with fabric paint... I could have used the markers on this... |
It took me two days to finish the birds due to drying time for the paint.

I actually did end up putting the emblems on upside down and had to remove them and replace them correctly... My mind was boggled by the time I was done! I worried that the material would be less sticky after being removed so I sewed a zig-zag stitch around the perimeter of the red circle.
I was happy to finish the flag for Dominica and I really hope it holds up to the elements...

I found that the instructions for some of the more difficult flags didn't provide the most efficient way of putting the pieces together... St Lucia was that way... The instruction kind of said that you could just crease the hems of all three triangle pieces, line them up on the flag front and back kind of freeform, and sew them on. I felt that making the triangle pieces one first by stitching them together and THEN placing the two parts onto front and back made it much more easy to sew them onto the flag. Making the pieces match one another took a lot of trial and error.
 As the days marched on, my pile of flags was growing... It was actually becoming kind of fun using my Cruiser Brain to figure out the parts and pieces... A little bit of a challenge now and then is good for me!
 Grenada was another of those challenges... The triangles again!!!
Luckily they didn't have to be exactly the same to match up in the center because the small red circle covers the offset... The stars were cut out of the white ensign material and I used fabric markers to color them yellow.
Same with the little nutmeg symbols... two mirror images in white, but then I cut the little nut out of the red ensign material. I thought that if I had used red fabric marker, it would bleed into the yellow and look messy... This way it's nicely well defined.
 Dwindling down on the list... Aruba was another easy one and is the only flag I made that used the light blue material.
I cut out a white star and then stuck a smaller red star on top of it. That wasn't in the instructions but since I had both colors, I hope the colors of the ensign material will hold up better than the fabric markers in the wind and weather... we shall see...
 Perhaps the most difficult flags to make and the ones that left my mind feeling like I could have done them differently were St. Kitts & Nevis... and Trinidad & Tobago...
When the diagonal parts are folded over at the top, bottom, hoist and fly, the strips don't line up as they curl around the edges... They are very thick at these points and difficult to sew...
 So when I made Trinidad and Tobago I tried to fix this. It was touch and go there for a while as to whether or not I would have to completely remake the diagonal parts.
If you zoom in on this photo, you can see white zig-zag stitches at the top border of the black material.
What I did was pin both pieces of the diagonal panels onto the red flag body and then I cut off the parts that extended past the edges.
Then I used the cut pieces to fit back onto the opposite sides and stitched them together after I folded the top hems and stitched them...
I'm not sure if that really makes sense but if you make this flag you can kind of understand what I did. The zigzag part is where my seam joining the pieces back together wasn't quite robust enough so I tacked it down with a zig-zag. I didn't have to do that on the bottom end as I stitched it better.
I guess I didn't take comparative pictures of each side... but they look more identical than the two sides of the St. Kitts & Nevis flag shown above which show the mismatched stripes.
Anyway... Moving on around to the Western Caribbean... Last on the list was Panama. This was another flag that might look easy, but I'm an expert now and I don't need no silly instructions... That's a good thing because there weren't any!
 It took me a bit of figuring to make the pieces fit together using the proper seam joins and yet still have the panel colors line up perfectly... But I got it done and if you save this flag for last, you should be able to do it as well... The only mismatch that couldn't be helped was the hoist and fly where the colors curl around and overlap... dratts!
Suddenly I had a pile of nearly completed flags! I could have continued on and made a Diver-Down flag using knowledge I've gained from this book...
 I could have created new handmade US and Texas flags... or maybe a ships ensign for Dos Libras with our symbol on it... but let's get real here folks! I've been sewing these things for most of two weeks and I still have other projects that need doing before we leave here. And time is growing short!
So I got out the grommets an the hot knife... and spend most of a morning installing grommets onto the hoists of 17 flags!
Using the special tip for the hot knife for making holes.. I carefully marked the position of each grommet.
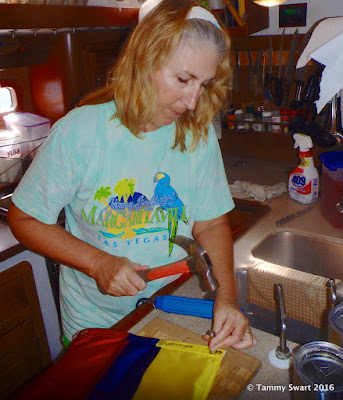 It takes great concentration and a steady hand to burn the holes through the fabric without melting too much. It's delicate work but with practice it began to go faster.
You could probably figure out a way to make the holes without the hot knife using a punch of some sort, but some of the material you have to go through is very thick so it would be difficult.
Installing the grommets is easily done with the right tools and it went pretty fast as well. The first two flags I made were done with larger-than-recommended grommets that we had on hand. I don't advise this, use the smaller grommets. They work better.
Once I had the grommets done, I used fabric paint to label the flags and point which way is up. This is an extra step and maybe unnecessary, but I didn't want to have to dig out the book every time we hoist a new flag... I used paint which took an extra day of drying time before I could run all of my flags together up the halyard for the ultimately triumphant photo op!
I am supremely happy with how they all turned out. After a few rough patches, the project on the whole was fun and I wish I had begun it earlier in the summer and done those extra flags mentioned above. Perhaps we will stop somewhere and another sewing jag will hit me. I still have quite a bit of leftover material after making all of these. And there are still a few flags I did not make in the book...
 Before we took off cruising, I searched the internet and blogs to find out where people were getting their courtesy flags. There wasn't much mention of it outside of other people who made their own, or the occasional coup found on Ebay or somebody selling off their stock.
Some people are buying the really cheap stick flags and altering those to go up the halyard... I applaud their thriftiness and ingenuity but I just couldn't do that. Our Bahamas flag was store bought and although it cost $19.99 at West Marine (and only $10 in the actual Bahamas) the quality is extremely poor... we replaced the Bahamas flag three times before we left there the second time.
One tip if you are buying ready-made flags, if you sew another seam along the fly it can extend the life of the mass produced flags...
I made my flags using the Sailrite LZ machine, with size #16 needle. But these flags could well be made on a non-commercial machine so give it a try!
Was it worth it? Buying the flags online can cost between $19.99 and $49.99 if you don't go the stick-flag route. My materials cost in the neighborhood of $150 because I already had some of the supplies needed... and I still have supplies leftover...but I would say that I have a full set of very sturdy flags that will withstand the elements far better than the machine made flags. If they do get torn up I can repair them... And I had fun making them.
And this concludes all I know about making your own Courtesy Flags! Unfortunately I don't know of an instruction booklet for other flag groups... if you do, please share in comments!
I was happy to finish the flag for Dominica and I really hope it holds up to the elements...

 |
| St Lucia |


Luckily they didn't have to be exactly the same to match up in the center because the small red circle covers the offset... The stars were cut out of the white ensign material and I used fabric markers to color them yellow.
Same with the little nutmeg symbols... two mirror images in white, but then I cut the little nut out of the red ensign material. I thought that if I had used red fabric marker, it would bleed into the yellow and look messy... This way it's nicely well defined.

I cut out a white star and then stuck a smaller red star on top of it. That wasn't in the instructions but since I had both colors, I hope the colors of the ensign material will hold up better than the fabric markers in the wind and weather... we shall see...

When the diagonal parts are folded over at the top, bottom, hoist and fly, the strips don't line up as they curl around the edges... They are very thick at these points and difficult to sew...
 |
| It's more obvious in this photo... |

If you zoom in on this photo, you can see white zig-zag stitches at the top border of the black material.
What I did was pin both pieces of the diagonal panels onto the red flag body and then I cut off the parts that extended past the edges.
Then I used the cut pieces to fit back onto the opposite sides and stitched them together after I folded the top hems and stitched them...
I'm not sure if that really makes sense but if you make this flag you can kind of understand what I did. The zigzag part is where my seam joining the pieces back together wasn't quite robust enough so I tacked it down with a zig-zag. I didn't have to do that on the bottom end as I stitched it better.
I guess I didn't take comparative pictures of each side... but they look more identical than the two sides of the St. Kitts & Nevis flag shown above which show the mismatched stripes.
 |
| I made the stars before I began sewing the panels |

Suddenly I had a pile of nearly completed flags! I could have continued on and made a Diver-Down flag using knowledge I've gained from this book...

So I got out the grommets an the hot knife... and spend most of a morning installing grommets onto the hoists of 17 flags!
Using the special tip for the hot knife for making holes.. I carefully marked the position of each grommet.

You could probably figure out a way to make the holes without the hot knife using a punch of some sort, but some of the material you have to go through is very thick so it would be difficult.
Installing the grommets is easily done with the right tools and it went pretty fast as well. The first two flags I made were done with larger-than-recommended grommets that we had on hand. I don't advise this, use the smaller grommets. They work better.
 |
| Labeling the flags with coordinating colors in paint |
I am supremely happy with how they all turned out. After a few rough patches, the project on the whole was fun and I wish I had begun it earlier in the summer and done those extra flags mentioned above. Perhaps we will stop somewhere and another sewing jag will hit me. I still have quite a bit of leftover material after making all of these. And there are still a few flags I did not make in the book...
 Before we took off cruising, I searched the internet and blogs to find out where people were getting their courtesy flags. There wasn't much mention of it outside of other people who made their own, or the occasional coup found on Ebay or somebody selling off their stock.
 Some people are buying the really cheap stick flags and altering those to go up the halyard... I applaud their thriftiness and ingenuity but I just couldn't do that. Our Bahamas flag was store bought and although it cost $19.99 at West Marine (and only $10 in the actual Bahamas) the quality is extremely poor... we replaced the Bahamas flag three times before we left there the second time.
One tip if you are buying ready-made flags, if you sew another seam along the fly it can extend the life of the mass produced flags...
I made my flags using the Sailrite LZ machine, with size #16 needle. But these flags could well be made on a non-commercial machine so give it a try!
Was it worth it? Buying the flags online can cost between $19.99 and $49.99 if you don't go the stick-flag route. My materials cost in the neighborhood of $150 because I already had some of the supplies needed... and I still have supplies leftover...but I would say that I have a full set of very sturdy flags that will withstand the elements far better than the machine made flags. If they do get torn up I can repair them... And I had fun making them.
And this concludes all I know about making your own Courtesy Flags! Unfortunately I don't know of an instruction booklet for other flag groups... if you do, please share in comments!


