 We have been using a single line with a hook as our anchor chain snubber. I've had my eye on the Mantus chain hook for months, and we finally bought one. Now we have to create the snubber attachment for it. The folks at Mantus would be happy to sell us one, but we're poor Cruisers and will have to settle for making one ourselves.
I did a little bit of research on the Internet and found this very helpful article from Sail Delmarva, a blog that I've been following for some time. It was very helpful and I was able to formulate a plan from their post. The big mystery for me was the y-splice (which turns out to be only an eye splice-without the eye - duh).
 |
| Our "Not so Nice" splice |
We set to work over several day, creating the splices, first the eye, then the y-splice, followed by two more eye splices to create the loops on the legs to go over the cleats.
We found some instructions online, but really got a big boost (a little too late) from a You-Tube video and became much better at it...about half way through.
 |
| Our "better" splice |
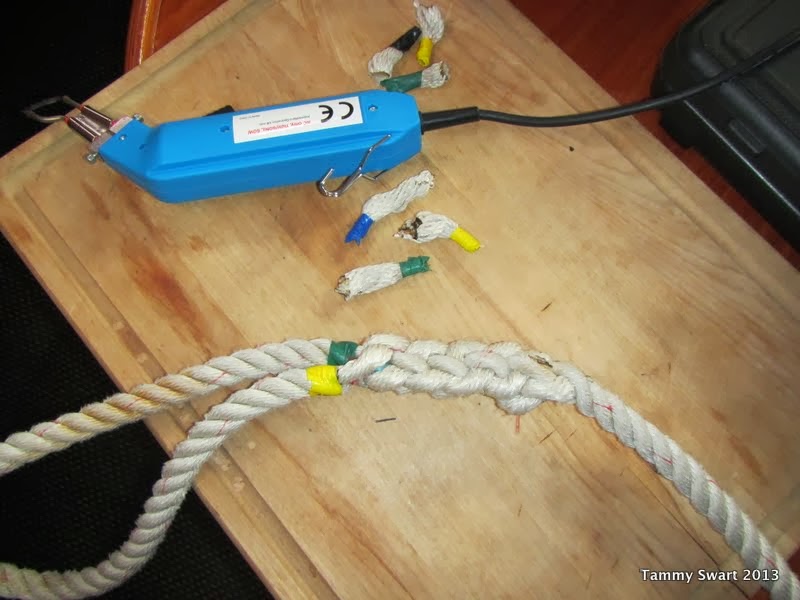
We should have watched it several times because we finished a very nice splice, then went to bed. When we got up and started on it in the morning, we got a little messed up again... So the result is that we have two pretty nice looking splices, and two kind of gnarly looking ones.
At that point, our hands hurt so much from wrestling with that line, we didn't care. As long as it looked like it would hold, we are fine with it! We used our hot knife to cut the ends, which really seems to secure them well.

We secured the lines to cleats and then we winched the lines tight so that we could whip some of the end areas to further secure them. Bruce attached the Mantus Hook to the snubber with a shackle and wired it closed. Then we used zip ties to keep the chafe gear in place and voila! We're done!
 |
| 16 Foot Snubber line |
We can't wait to test our new snubber on Saturday at Baffle Point! We're watching the weather and should be set to go Saturday morning to begin the next leg of our Cruise!
Don't worry if it looks a little knarly. After it has been stretched with the stress of being anchored during high winds a few times it will look just fine. We paid a company to splice our 1 1/4 inch multi-braid snubber line to a Pelican hook (the style we prefer rather than the Mantus), and the splice looked perfectly awful. I could not believe we had paid someone to do a job that looked worse than if we had done it ourselves! Fast forward to being anchored through a few small storm cells and that splice looks perfect. It just needed the stress applied to tighten up the splicing.
ReplyDeleteYes that is one of the good things about doing things ones self.. one's standards are more realistic! I HATE paying for something that isn't perfect, and it hardly ever is. I'm much more accepting of flaws when I do the work myself. Plus, (I tell myself) flaws add character!
DeleteI guess I'm learning to "trust" that you can just wrap some line around itself and it will be strong. We'll be watching it though. It's only the snubber, wait until we put our chain/rope splice to the anchor test!
Try using a hollow fid to get the strands through easier. New line splices easier than old line. Some whip the splice as additional security. Bon Vouyage. Da Shells in Clear Lake
ReplyDeleteI guess I don't know what a hollow fid is. We use a marlin spike to get the strands to separate and it works pretty well. We whipped all of our splices, another not-so-pretty job. We did a couple before we found out that we were supposed to whip them under load, so we had to do a couple over again. It's all a learning process. We'll be Pros before too long! Maybe we should have "invited" you over to help us out! We aren't leaving until Saturday... come see us!
DeleteMy husband recently taught himself to do this. It was much easier than he thought; but much harder to actually do it. And his loop does not look perfect. I will have to tell him that it will look better over time.
ReplyDeleteMarie, I will say that I found some conflicting instructions which made it more difficult for us. The sources in my post were the most helpful to us. Once you figure it out, it really isn't difficult. But using new line is easier than older and more stiff line. Our hands really got a workout. Hopefully we are finished splicing for a while. Thank you for reading and for your comment!
Delete